Step-by-Step Guide: Assembling Your SkyPro 1500 Retractable Belt Barrier
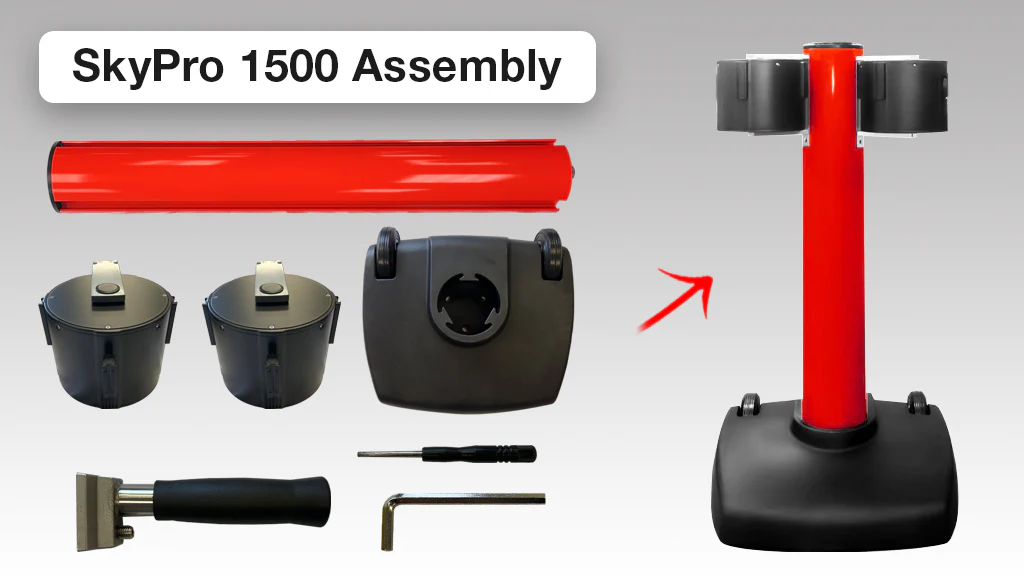
When it comes to controlling access to large areas, the SkyPro 1500 Retractable Belt Barrier stands out as an exceptional choice. Not only does it offer an impressive 150 feet of retractable belt length, but it’s also designed with ease of assembly in mind. In this step-by-step guide, we’ll walk you through the process of assembling your SkyPro 1500 so you can quickly and efficiently put it to work.
Parts Required
Supplied:
- 1x Sky Pro Post
- 1x Sky Pro Base
- 1x Handle
- 2x Belt Unit
- 1x Mini Screwdriver
- 1x Allen Key
- 1x Post Top Light
Not Supplied:
- 1x Wrench

Step 1: Secure the Post to the Base
The first step is to lift up the post and remove the bolts at the bottom of the post. Once you’ve removed the bolts, insert the post into the base of the stanchion. This step creates the foundational connection between the post and the base.


Step 2: Attach Bolts to the Bottom of the Post
With the post securely inserted into the base, carefully tip the stanchion over, ensuring that the post remains secured inside the base. Now, reattach the bolts to the bottom of the post. This step is crucial for establishing a solid and stable connection between the base and the post.

Step 3: Loosen Screws at the Top of the Stanchion
Tip the stanchion back upright and use the mini screwdriver provided to loosen the screws at the top of the stanchion. You don’t need to fully remove these screws; just loosen them to remove the cap and prepare for the handle installation.

Step 4: Insert and Secure the Handle
Once the screws are loosened, remove the top cap and slide the handle into the slotted groove on the post. Be sure to place the handle in the groove located at the back of the stanchion so that the handle aligns parallel to the wheels. With the handle in the desired position, tighten the screw at the bottom of the handle.

Step 5: Install the Belt Cassettes
Slide in the two belt cassettes into the remaining two slotted grooves on the post. To make it easier these can be allowed to sit at the bottom of the post while you proceed with the next steps.

Step 6: Reattach the Top Cap and Tighten Screws
Reapply the cap onto the top of the stanchion and tighten the screws at the top of the post using the mini screwdriver provided. These are the same screws that were loosened in Step 3.

Step 7: Secure the Belt Cassettes
Slide each of the cassettes to the top of the stanchion and tighten the screw at the bottom of each cassette. This action creates a strong and reliable connection between the cassettes and the post, ensuring they stay in place during operation.

Step 8 (Optional): Add the High Visibility Light
As an optional step, you can now place the high visibility light at the top of the stanchion. This is done magnetically and requires no extra setup steps. Keep in mind that the on and off switch for the light is located on the bottom of the light unit.

Conclusion
With these nine simple steps, you’ll have your SkyPro 1500 Retractable Belt Barrier assembled and ready to use. Whether you need to control access on airport tarmacs, in stadiums, factories, warehouses, parking garages, or any other large-scale setting, your SkyPro 1500 is now primed to streamline your access control efforts effectively.
If you liked this post, make sure to check out our post on the SkyPro 1500.
For more information about this product and more, please view our full line of safety barriers.

